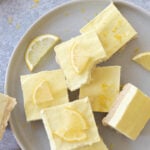
These vegan and gluten-free lemon bars have a cool silky texture atop a sweet, crumbly and buttery grain-free crust. They skip the butter, refined sugar, condensed milk, egg yolks and heavy whipping cream for healthier vegan ingredients. This dessert offers plant-based protein, fiber and healthy fats all while staying true to the sweet, tangy taste and creamy, airy texture you would expect from lemon bars.

Vegan and Gluten-Free Lemon Bars


Craving more lemon recipes?
- Lemon Blueberry Muffins (refined sugar-free and nut-free)
- Easy No-Churn Vegan Lemon Ice Cream
- Creamy Lemon-Parsley Hummus
- Cauliflower Steaks with Lemony Mashed Peas and Mint
- Creamy Lemon Dill White Bean Dip
- Lemon Olive Oil & Dill Potato Salad (No Mayo)

Now, let’s make Vegan Gluten-Free Lemon Bars!
This Vegan Gluten-Free Lemon Bars recipe will be an instant favorite to serve for an easy dessert. The lemon bars are vegan, gluten-free, grain-free, paleo and refined sugar-free.

I cannot wait for you to give this Lemon Bar recipe a try!

Vegan Gluten-Free Lemon Bars (refined sugar-free)
- Total Time: 20 minutes
- Yield: 16
- Diet: Vegan
Description
These vegan and gluten-free lemon pie bars have a cool silky texture atop a sweet, crumbly and buttery grain-free crust. They skip the butter, refined sugar, condensed milk, egg yolks and heavy whipping cream for healthier vegan ingredients. This dessert offers plant-based protein, fiber and healthy fats all while staying true to the sweet, tangy taste and creamy, airy texture you would expect from lemon bars.
Ingredients
- 1 ½ cups super-fine blanched almond flour
- 3 tablespoons unrefined coconut oil, melted
- 2 tablespoons pure maple syrup
- 1 teaspoon vanilla extract
- ¼ teaspoon fine salt
For the filling:
- 1 cup raw cashews, soaked in advance if possible
- 1, 13.5 ounce can full-fat coconut milk, chilled for 24 hours [in this recipe we are only the solid white coconut cream portion of the can]* - see my review of the top brands.
- ¼ cup pure maple syrup
- 2 large juicy lemons, zested and juiced
- 2 tablespoons arrowroot starch
- 1 teaspoon pure vanilla extract
- pinch of fine salt
- ⅛ teaspoon turmeric (for color)
Instructions
- Preheat oven to 350 degrees Fahrenheit and line an 8x8 baking pan with parchment paper.
- In a large mixing bowl stir together the almond flour, coconut oil, maple syrup, vanilla and salt until well combined. Transfer this mixture to the parchment-lined baking pan. Top with another piece of parchment paper and use the bottom of a cup to flatten the mixture so it is in one even layer covering the entire bottom of the pan. Bake for 10 minutes. Remove from oven and allow to cool for 10 minutes before adding the filling.
- While the pie crust bakes and cools, prepare the filling. Add soaked cashews, the solid white portion of the refrigerated can of coconut milk (i.e. the coconut cream), maple syrup, lemon zest, lemon juice, arrowroot starch, vanilla, salt and turmeric to a high speed blender. Blend on the highest speed for one minute. Scrape down the sides if needed and re-blend to make sure everything is fully incorporated. Pour overtop the cooled pie crust and place the baking pan on a flat surface in your freezer. Allow to freeze for four hours before slicing and enjoying. If the bars have been in your freezer for longer than four hours you may need to allow them to soften at room temperature for a couple minutes before slicing and enjoying. The bars will start to melt a little bit at room temperature after about 20 minutes so store them in your freezer until just before you plan to serve.
- You can top them off with homemade coconut whipped cream for an airy, sweet, cool and creamy finish. You can sprinkle lemon zest on top and garnish each bar with a fresh lemon slice just to make them look extra fancy.
Notes
* Place a can of full-fat coconut milk in your refrigerator 24 hours in advance of making this recipe. Do not use a can of coconut cream or light coconut milk. When you open the can of refrigerated full-fat coconut milk the solid white coconut cream will naturally float to the top of the can (leaving the coconut water at the bottom of the can). Use a spoon to carefully separate the solid white coconut cream from the coconut water below it. This recipe only uses the white coconut solid portion. You can save the coconut water for smoothies.
- Prep Time: 10
- Cook Time: 10
- Category: Dessert
- Method: Oven + Freezer

Elizabeth Solomon says
Hi. These look so good! We don't have coconut milk. Is there anything else that can be used instead?
Elaine Gordon says
Thank you! Unfortunately, no. The canned full-fat coconut milk helps them stay solid and creamy and other plant-based milks don't do that. I'm sorry! Are you allergic or do you just not have that ingredient on hand?
Cheleste Deveraux says
What would you use to substitute almond flour? Cassava?
Elaine Gordon says
Good question... maybe!? I'm not sure as I haven't tried this recipe with any other flours. Maybe you could try chickpea flour or oat flour as well? Or a mix? It is tough to say since each flour has a different density, flavor and texture when baked. They all absorb different amounts of liquid too which can impact the final results. If you do try using cassava flour or any other flour please let me know how it goes!
Caroline says
Hi, these look great but I'd like to know what the arrowroot brings to the recipe, I thought it needed to be cooked to activate it/become a setting agent but the filling isn't baked, is that right?
Elaine Gordon says
Hi Caroline: It is a general thickening agent in this recipe. You could try leaving it out though if you prefer. I haven't tested it that way so I cannot guarentee results. If you do please let me know. Thank you! Elaine
Joanne Cotton says
I made this recipe and these are fantastic!!!
Elaine Gordon says
Thank you so much, Joanne! So happy you enjoyed them. Best, Elaine
Candace says
So excited to make these! How to you recommend storing these bars? Is it best to put foil or plastic wrap around the pan and store the whole thing in the freezer, or do you find it easier to slice the bars and move them into containers before placing in the freezer? Also, how long do they keep? Thank you so much!!!
Elaine Gordon says
Thank you, Candace and I apologize for the delay in getting back to you. Your comment didn't got through to my notifications initially for some reason. For this recipe you want to freeze them, slice them, then store in an airtight container in your freezer for up to three months. After that look for normal signs of spoilage. I hope that helps! Please let me know if you give them a try what you think! Best, Elaine
Caitlin says
Hi Elaine!
Excited to try these out — love all the recipes I’ve tried from your site so far! Weird question: do you think mixing ground pistachios into the crust would work? I have an excess of pistachios (bulk foods mishap) that I’m trying to get creative with. 😂
Elaine Gordon says
Hi, Caitlin: Thank you so much and I'm so glad you have been enjoying my recipes. For this one are you thinking of swapping the almond flour for the pistachios? Or adding them? I'm usually adventurous with recipe substitutions in general but with baking recipes I try and stick to the exact recipe for the best results. I would worry that the pistachios would change the taste and texture and overall crust results too much. Have you seen my Jennifer Aniston salad recipe? That uses an entire cup of pistachios! https://www.eatingbyelaine.com/jennifer-aniston-viral-perfect-salad-recipe-made-vegan-gluten-free/
I hope that helps! Best, Elaine
Emily says
Can we substitute the almond flour?
Elaine Gordon says
Hi Emily: Good question! Unfortunately not for this recipe. Almond flour is a unique flour to bake with in that it has a different texture and absorption level than all other flours. It would throw off the wet to dry ingredient ratio completely if you substituted with any other flour. I hope this is helpful and please let me know if you give these a try! Best, Elaine
Kim Kerner says
I made these and they are so good. Not very sweet, which I loved. Just perfect. Do keep in the freezer, as they will melt quickly at room temperature. I found out the hard way. Highly recommend.
Elaine Gordon says
Thank you so much for the five star review, Kim! I'm so happy to hear you enjoyed them! And, yes, they definitely will melt at room temperature after a bit so I do recommend storing in the freezer until just before enjoying. I hope you were able to recover any that melted! Best, Elaine
Angela Maldonado says
Oh my goodness! So good!!
Elaine Gordon says
Thank you so much, Angela! I'm so happy to hear you enjoyed this one! Best, Elaine
Monica Thomas says
I love this recipe! As someone who is bad at baking/prepping desserts, this was easy to follow. These were so lemony, like the perfect amount of lemon. Biting into them was almost like biting into fudge, but more substantial. Tart & perfect for summer, I'll definitely make these again!
Elaine Gordon says
Thank you so much for this incredibly thoughtful comment, Monica! Thank you so much for making my recipes and thank you so much for this comment. I agree the texture is like fudge! If you have a chance to leave a five star rating that would be super helpful 🙂 I hope you are well and it is great to hear from you! Best, Elaine
Sarah says
Hi, just wondering if these can be stored in the fridge after freezing? Thank you
Elaine Gordon says
Hi Sarah: They store best in the freezer so they stay firm and structured. I hope that helps. Please let me know if you have any follow up questions. Best, Elaine
Angela Rocchi says
These bars are so delicious and the texture was perfect! The whole family, vegan and not, devoured it. Thanks so much!
Elaine Gordon says
Thank you so much for letting me know! I'm so happy to hear the entire family regardless of diet enjoyed! What a win! Best, Elaine
Irene says
I made these for a casual lunch in 80+ degree weather and they were refreshing, delicious and a big hit. Already got a request for the recipe! This one goes into regular rotation!
Elaine Gordon says
Thank you so much, Irene! I really appreciate this review. If you are able to give it a five star rating that would be great. Thank you!