Don't have a juicer but want to enjoy freshly made green juice at home!? I got you! All you need is a blender and a nut-milk bag and you are all set!
Below I'm sharing exactly how to make the best green juice recipe at home without a juicer. Its easy and so much more tasty (and less expensive!) than bottled juices anyways! And it takes less than 10 minutes to make. What's not to love?

I made this green juice recipe recently on my Instagram stories (it is saved in my highlights under FOOD INSPO if you are interested in watching the demo). I got so many questions and when I polled my Instagram followers over 90% were interested in the detailed recipe. So here you go!
If you are looking for other super simple juices for the summer, why not give my recipes for Orange Crush (mocktail or cocktail) and Cucumber Melon Spritzer a try? Both are cool, delicious and ready in just 10 minutes. They are the perfect way to cool off on hot days.
For more tips on juicing with a juicer and more juice recipes, check out my Favorite Homemade Fresh Juices recipes. This refreshing ABC Juice is a reader-favorite!
Why Make Blender Green Juice?
I'm a smoothie girl through and through. Because smoothies offer the entire fruit or vegetable you get all the nutrients and fiber which is so important. But on occasion I crave a cleansing, light and refreshing green juice (green juice = blender juice made from green vegetables).
So, rather than go to my local juice bar, I love to make this at home to use up leftover cucumber, celery and kale. I sometimes add herbs too such as parsley, cilantro or mint. You can use the leaves and stems of the herbs (same with the kale). You could also add peeled ginger.
I like to sometimes top mine off with sparkling water. My friend reports that it is also good with vodka like a Bloody Mary!

Ingredients
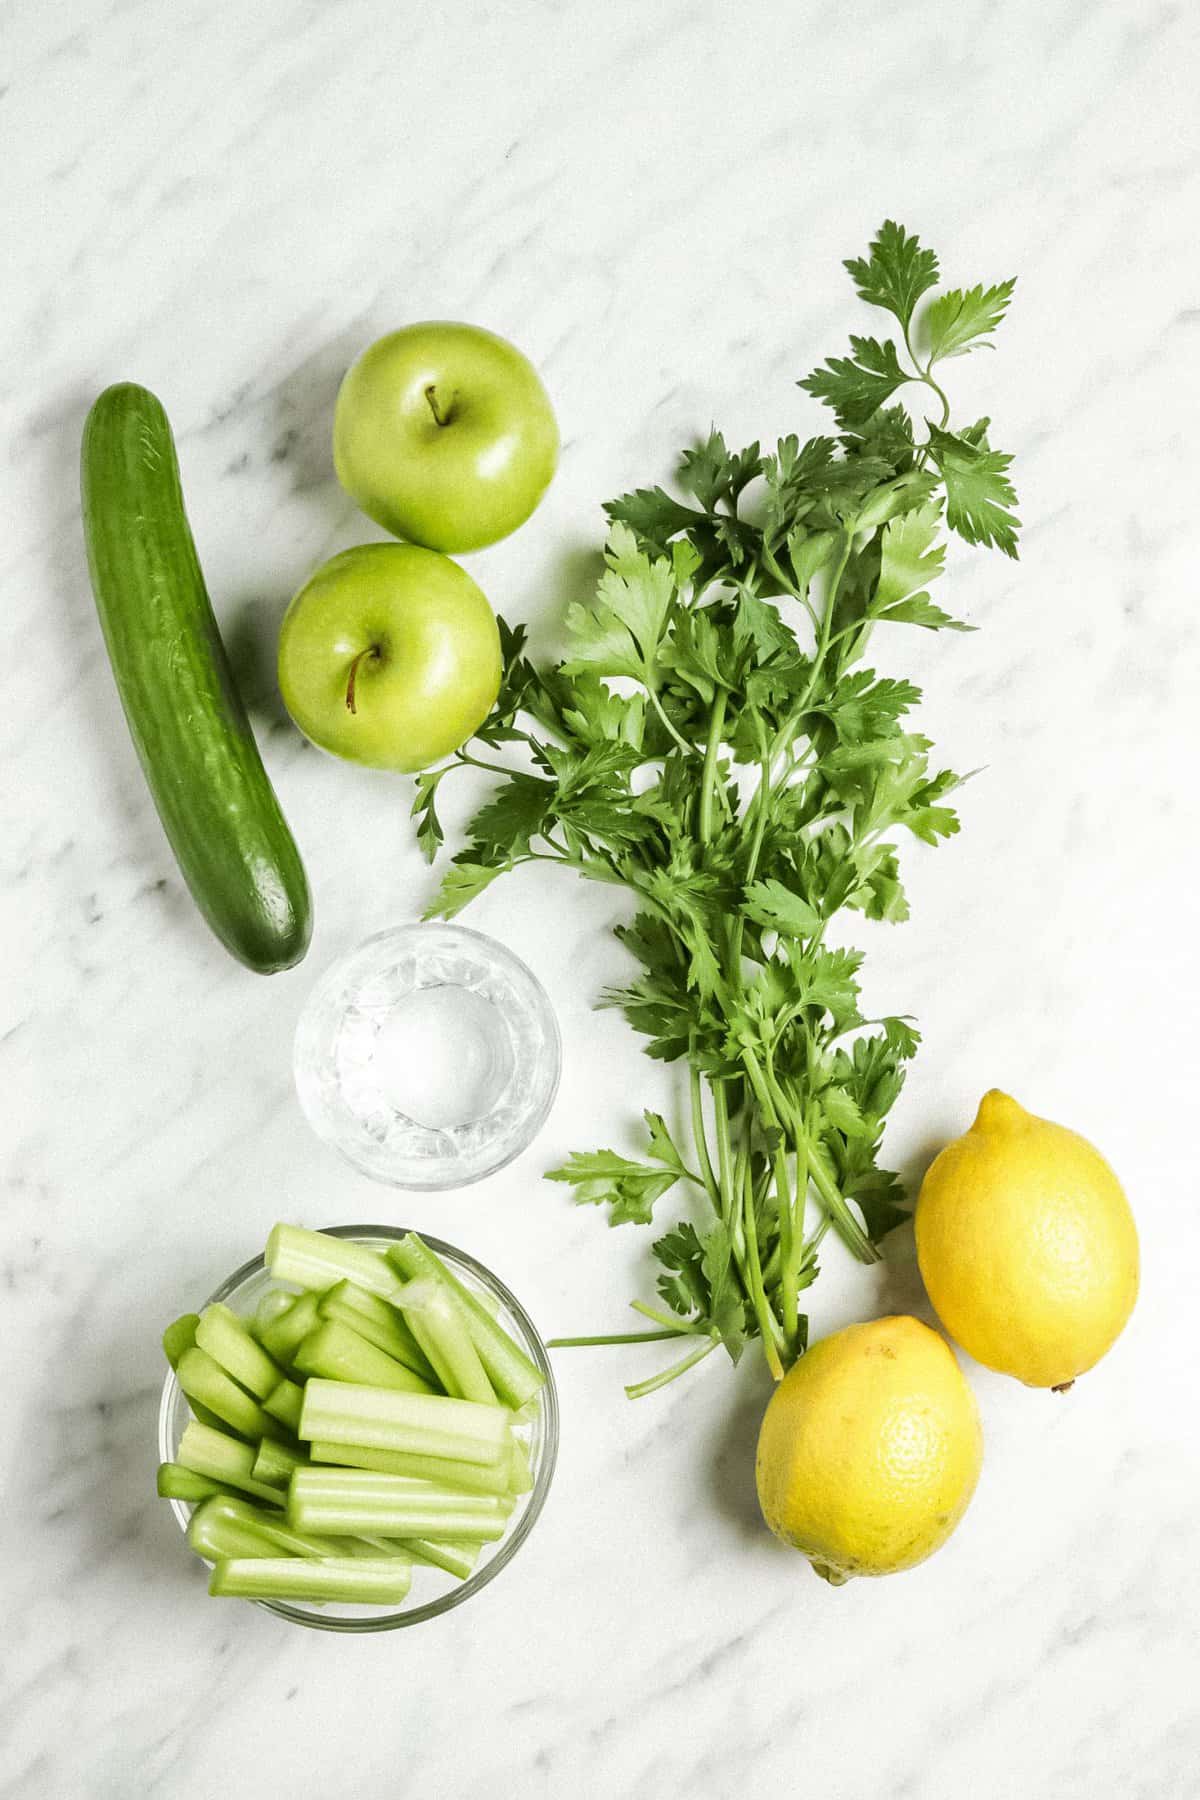
For this recipe you will need:
- Fresh parsley
- Celery
- English cucumber
- Granny Smith apples
- Large juicy lemons
- Water
- Additional add-ins: Kale, spinach, mint leaves, grated ginger, cilantro or lime juice
See recipe below for quantities.
How to Make Green Juice
This blender juice recipe is very flexible and forgiving. Once you get the process down you can experiment with the ingredients and ratios that suit you best. I usually go with whatever I have on hand and I haven't been disappointed with the result of this green juice yet.
The key I found is to balance things out with some sweet and tart Granny Smith apples. I also add in the juice of 1-2 lemons at the end to brighten it all up. I pour it over a lot of ice and enjoy immediately. This batch makes enough for 2-3 people.
Here is the overall process:
Blending ingredients: Throw your green veggies, herbs and apple in your blender (I chop them up first into 2 inch pieces for easy blending).

Add ½ cup filtered water and blend for 45 seconds until it is the consistency of a smoothie and no chunks or bits remain. If your blender is having trouble getting started you may need to add more water or cut your produce into smaller chunks.

Strain or serve: At this point you could pour over ice and enjoy if you want to consume the pulp (for more fiber and nutrients). I prefer a thinner consistency so I strain out the pulp using my nut milk bag. I have heard you can also use a fine mesh sieve but I have not tried this method myself yet.

Over a large mixing bowl with a pour spout, pour the mixture through a nut milk bag. The mixture will be thick. Use your hands to squeeze the juice through the nut milk bag.
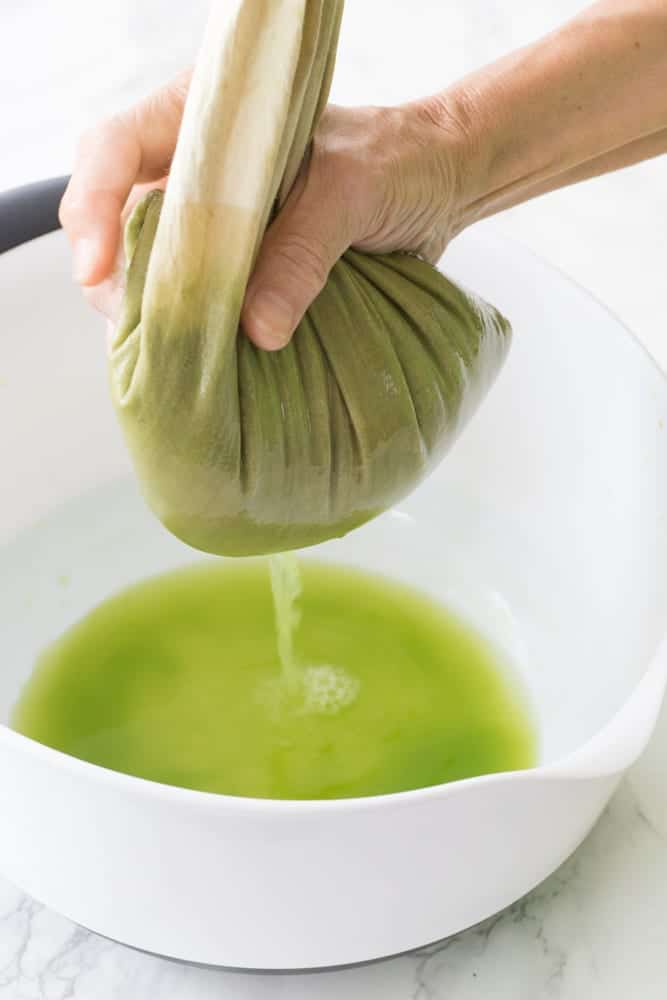
Getting the most juice out: Toward the end of squeezing I like to move all the pulp with my hands in a squeezing motion to the bottom of the nut milk bag and then twist in one direction. Then, I twist in the other direction to get all the juice out. This step takes 1-2 minutes.
Note: The green juice mixture will be very warm from blending.
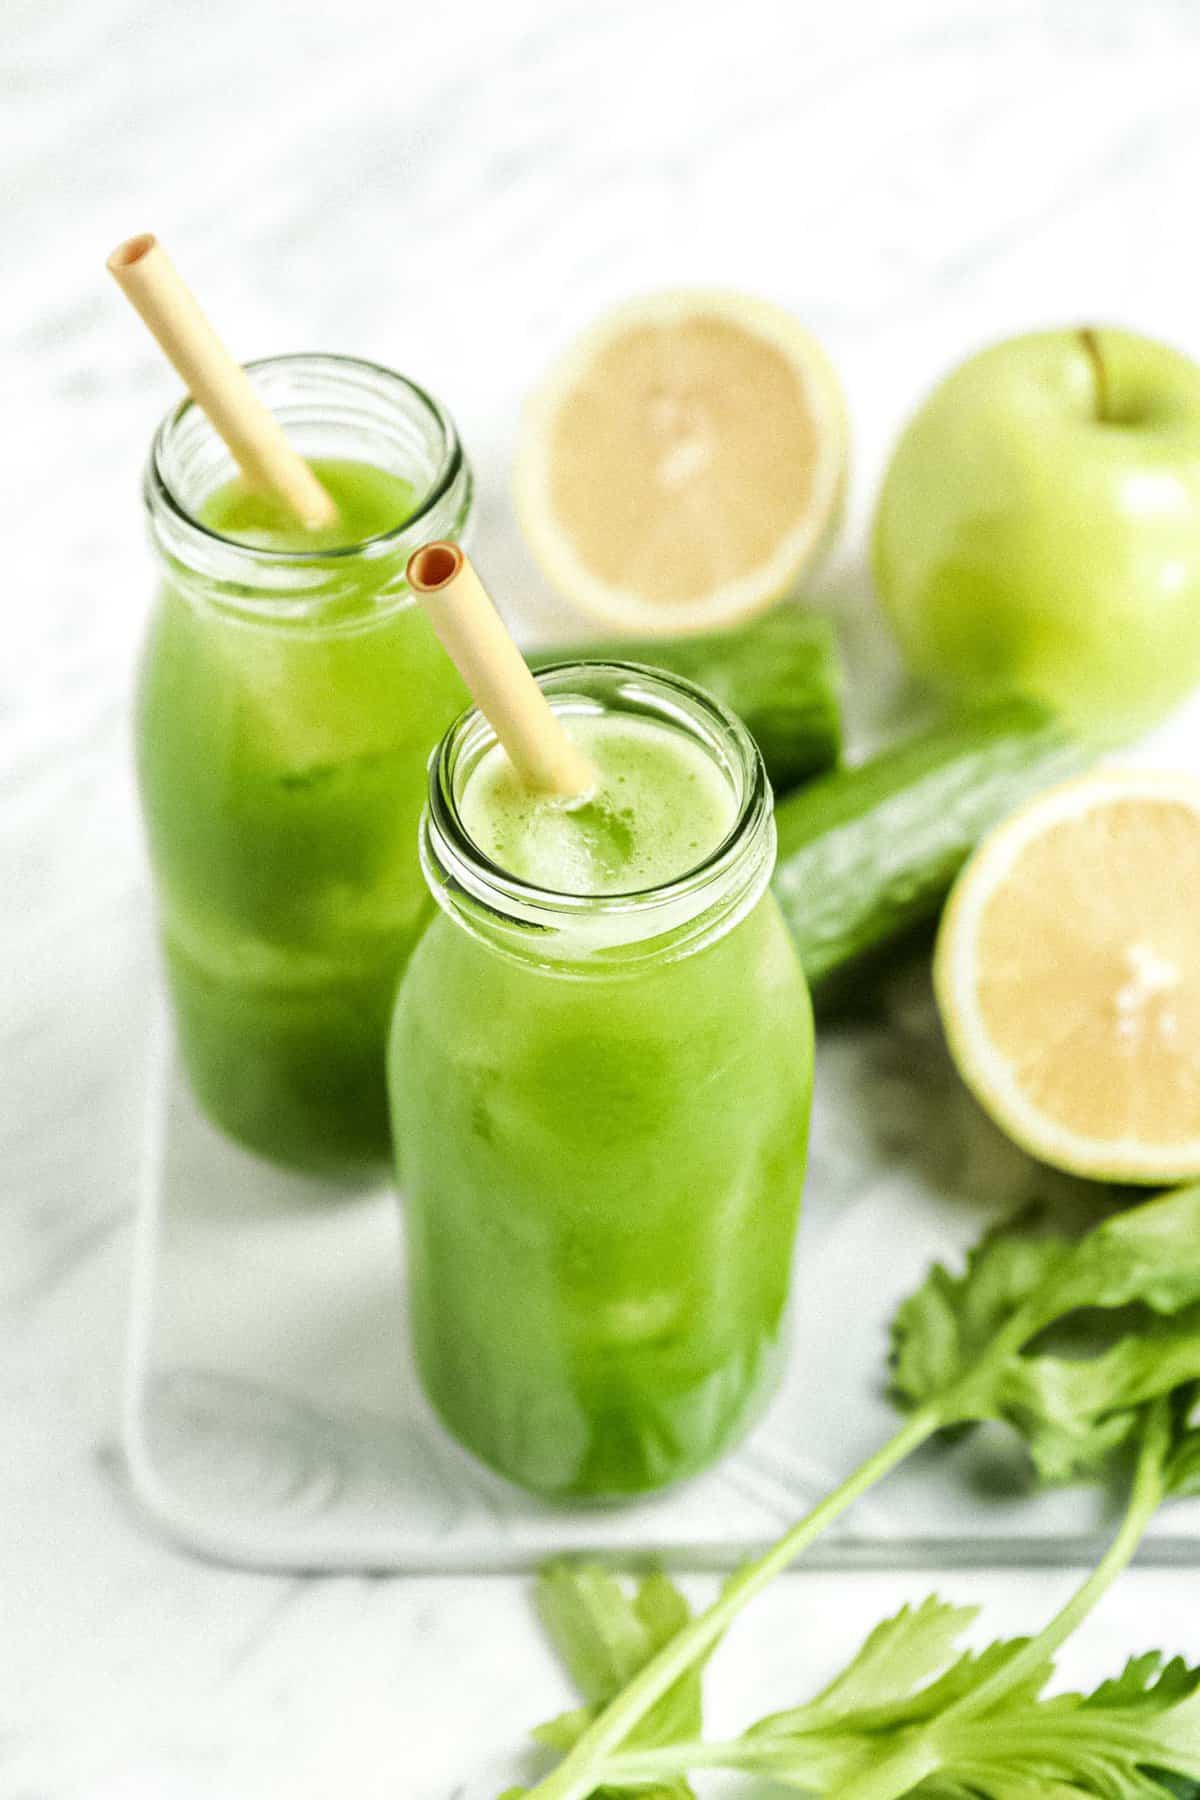
Lastly, squeeze in 1-2 juicy lemons using a lemon squeezer (I like to use two lemons).

Serving: Give the green juice a stir. As the mixture will be very warm, be sure to pour over a large cup filled with lots of ice cubes. Stir your green juice drink with a straw to let everything get well chilled and enjoy immediately.

Top Tip
You can make this juice in larger batches and have green juice ready for the next few days. You can easily double this recipe and store the juice in the refrigerator. But if you find that the ingredients are too much for your blender, first blend half of the ingredients until very smooth. Then add the rest, along with a splash of water and blend until smooth again.
The break between the two blends helps keep your blender cool and it is much easier to blend the harder apples and larger pieces of vegetables.
This green juice recipe is vegan, soy-free, grain-free, gluten-free, refined sugar-free, raw and nut-free. If you give it a try, please let me know! Leave a comment below, rate it above, and tag a photo @eatingbyelaine so I can see your green juice!

Best Green Juice In A Blender (No Juicer Needed)
- Total Time: 7 mins
- Yield: 2-3
- Diet: Vegan
Description
A cleansing, refreshing and very green juice to hydrate you through these hot summer months. Loaded with vegetables and sweetened with apples, this feel-good recipe will be your new favorite beverage. You can mix up the ingredients to suit what you have on hand. I just use whatever leftover vegetables I have in my fridge that I don't need. You can add herbs, kale or ginger.
Ingredients
- ½ cup filtered water
- 1 bunch of fresh parsley (you can use the stems)
- 6 stalks of celery chopped into 2 inch pieces (you can use the leaves)
- ½ large English cucumber (skin on)
- 2 Granny Smith apples, core and stem removed
- 2 large juicy lemons
- Additional ideas: kale (with stems), mint, cilantro, lime juice or ginger.
Instructions
- In a high speed blender, add the filtered water, parsley, celery, cucumber and apples. Blend on high speed for about 45 seconds or until completely smooth with no chunks remaining. You can enjoy like this or strain through a nut milk bag to remove the pulp (I prefer to do this).
- Pour the mixture into the nut milk bag while the nut milk bag is over a large mixing bowl with a pour spout. Squeeze the nut milk bag until all the juice is in the bowl and only the pulp remains in the bag. Immediately invert your nut milk bag to rinse it off in the sink.
- Squeeze in the lemon juice from the 2 lemons using a lemon squeezer or your hands. Stir.
- Pour the mixture over 2-3 cups filled with a lot of ice cubes. Stir with your straw to ensure it is well chilled and enjoy immediately. This juice is not pasteurized so I recommend enjoying immediately. I have never stored this and enjoyed later and I do not recommend doing so.


Notes
You can top your juice with sparkling water for some fizz if desired.
- Prep Time: 7 mins
- Cook Time: 0 mins
- Category: Beverage
- Method: Blender
- Cuisine: American

Moana says
I started doing this since January 2019, to try and curb my diabetes. I have lost 16 kg. I even add one kiwi, a slice of pine apple .. very refreshing. I make enough for 5 days., bottle it and store in fridge.
Elaine Gordon says
This is so fantastic, Moana! Thank you so much for taking the time to share. I'm thrilled for you! I love your addition of kiwi and pineapple for some nice sweetness and tartness. Sounds even more refreshing! And I love how you are batch making it too! Congrats! Best, Elaine
Francie Hunter says
I juice organic vegetables for my husband who has a history of cancer.
Since juicing is difficult (he needs 30oz./day), was wondering if your method would be healthy enough or would we lose enzymes through the blending process? Thank you!
Elaine Gordon says
Hi, Francie. Thank you so much for reaching out. I'm not a registered dietitian or a juicing expert by any means so I'm not 100% sure but I believe that cold pressed juicing contains more nutrients. With my blending method the juice does get quite warm so perhaps some of the nutrients are lost this way. But I honestly don't know how they compare. Please let me know if you have any other questions and I will do my best to answer honestly and accurately!
Lisandra Tabares-Perez says
This was delicious and refreshing. Also, I base Emmy ratings on if my picky toddler loves it haha. This was a hit! I will definitely be making this again, I love that I don’t have to take out the juicer.
Lisandra Tabares-Perez says
This was delicious and refreshing. Also, I base My ratings on if my picky toddler loves it haha. This was a hit! I will definitely be making this again, I love that I don’t have to take out the juicer
Elaine Gordon says
Thank you so much, Lisandra! I'm so glad you and your toddler love it! I hope you continue to enjoy!
Elaine Gordon says
Wow thank you so much! I'm so happy you enjoyed it so much. This is one of my favorites too!
Linda Purl says
Hello,
Such an easy and delicious drink.
Than you
Elaine Gordon says
Thank you so much, Linda! So happy you enjoyed the drink and the process! Best, Elaine