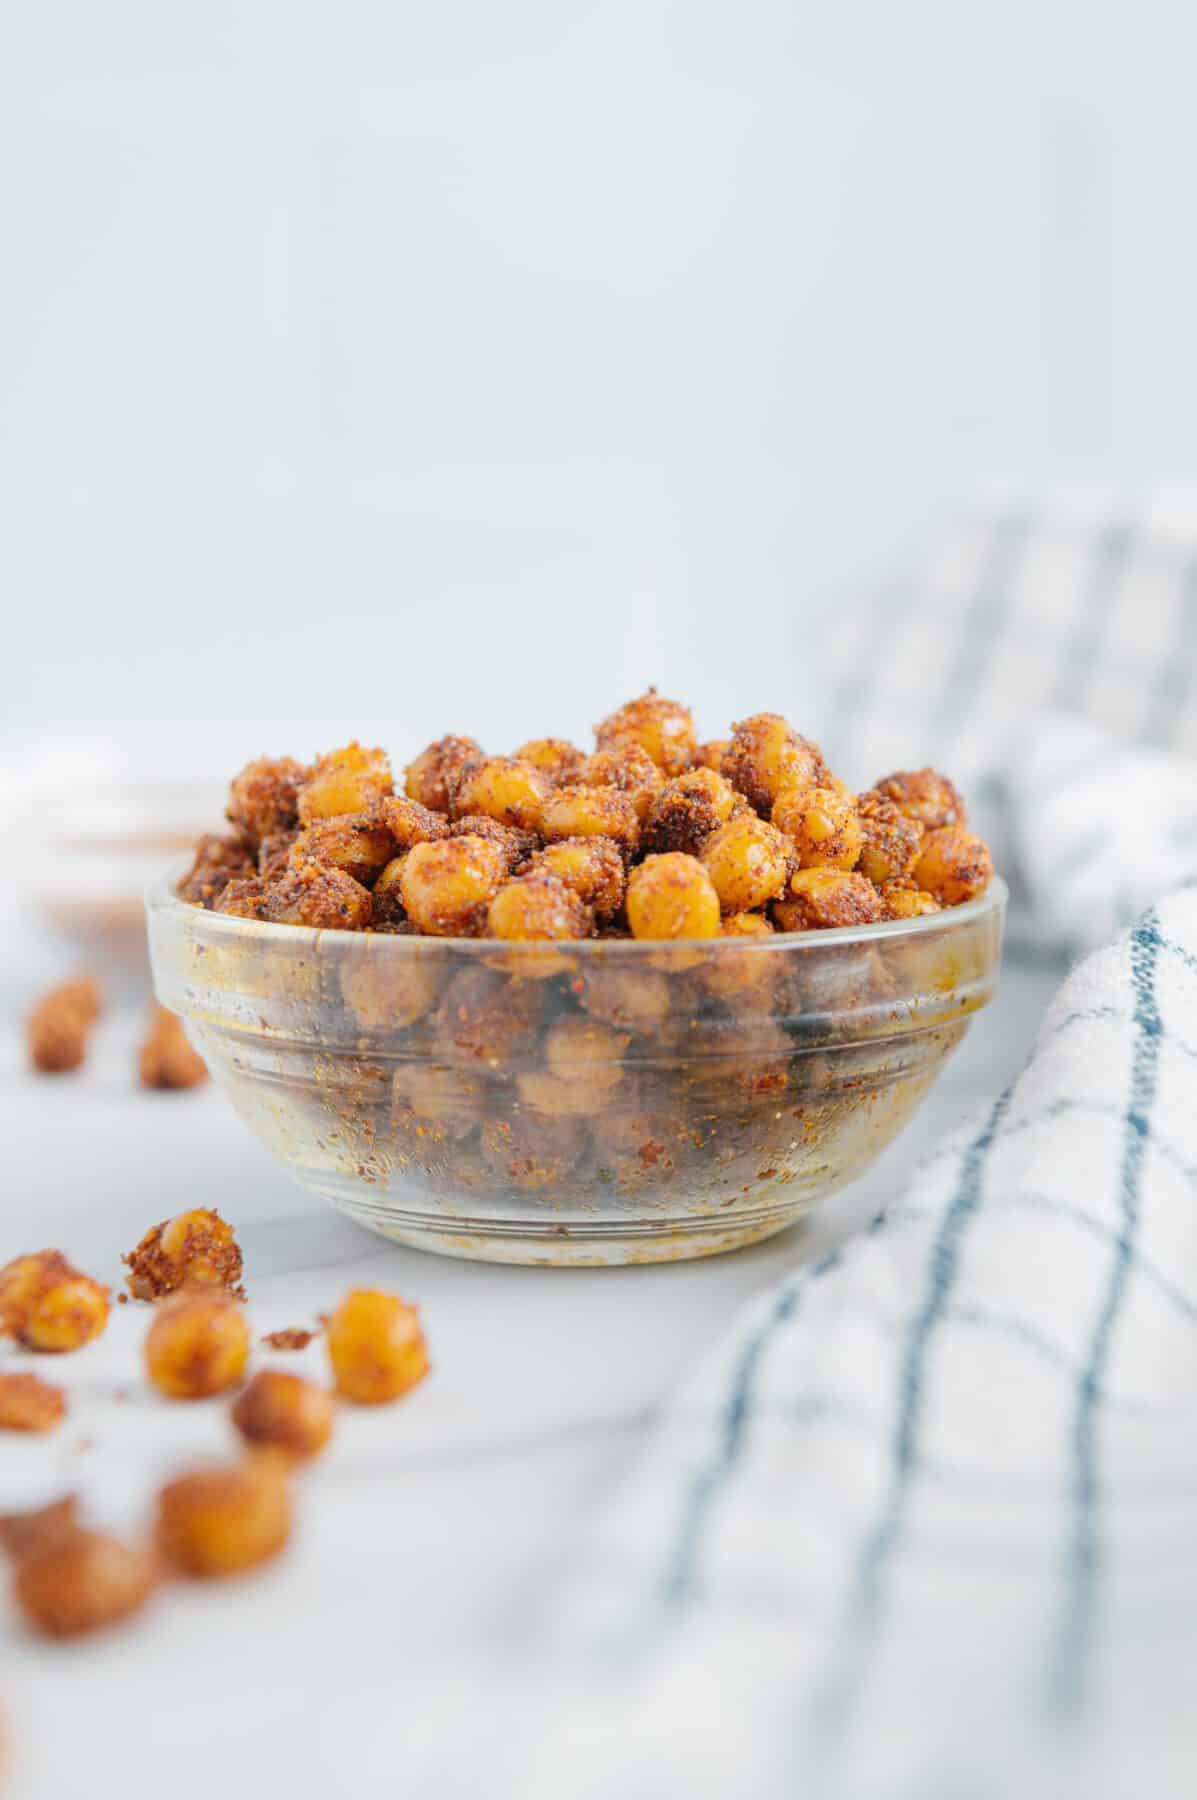
Forget chips...these crispy BBQ roasted chickpeas are even more addictive and satisfying, and they're way more nutritious! Made with just chickpeas and a simple DIY BBQ seasoning, this easy recipe makes for an excellent snack the whole family can enjoy. Vegan, gluten-free, nut-free and soy-free.

What do you reach for when you're craving a snack? I love something salty, crispy, flavorful and satisfying...and these BBQ roasted chickpeas check every single box!
They're filled with the perfect balance of spice and a hint of sweetness. And as a wonderful bonus, they're friendly for pretty much any allergy out there. I eat them by the handful, although they're also delicious on salads, soups and bowls. A true go-to!
All you need are a can of chickpeas, a little oil, maple sugar and a homemade spice blend to enjoy the incredible smoky flavor in this BBQ chickpeas recipe. So let's get started!
Homemade BBQ Seasoning
I created this homemade blend of spices to bring a smoky, sweet, perfectly seasoned BBQ flavor to these crunchy chickpeas. These are all simple ingredients that I'd bet are already in your spice cabinet, so it's a really easy one to throw together. See the recipe card at the bottom of the post for quantities.


- Smoked paprika
- Garlic powder
- Onion powder
- Chili powder
- Maple sugar
- Salt and pepper
Do I Have to Remove the Skin for BBQ Chickpeas?
In many chickpea recipes it doesn't make a difference whether you remove the skin or not, but in this one it does! I always remove the skins when I'm making crispy chickpeas. The skin can lock in moisture and create a steamed, soggier chickpea, which is definitely not what we're going for in this recipe.
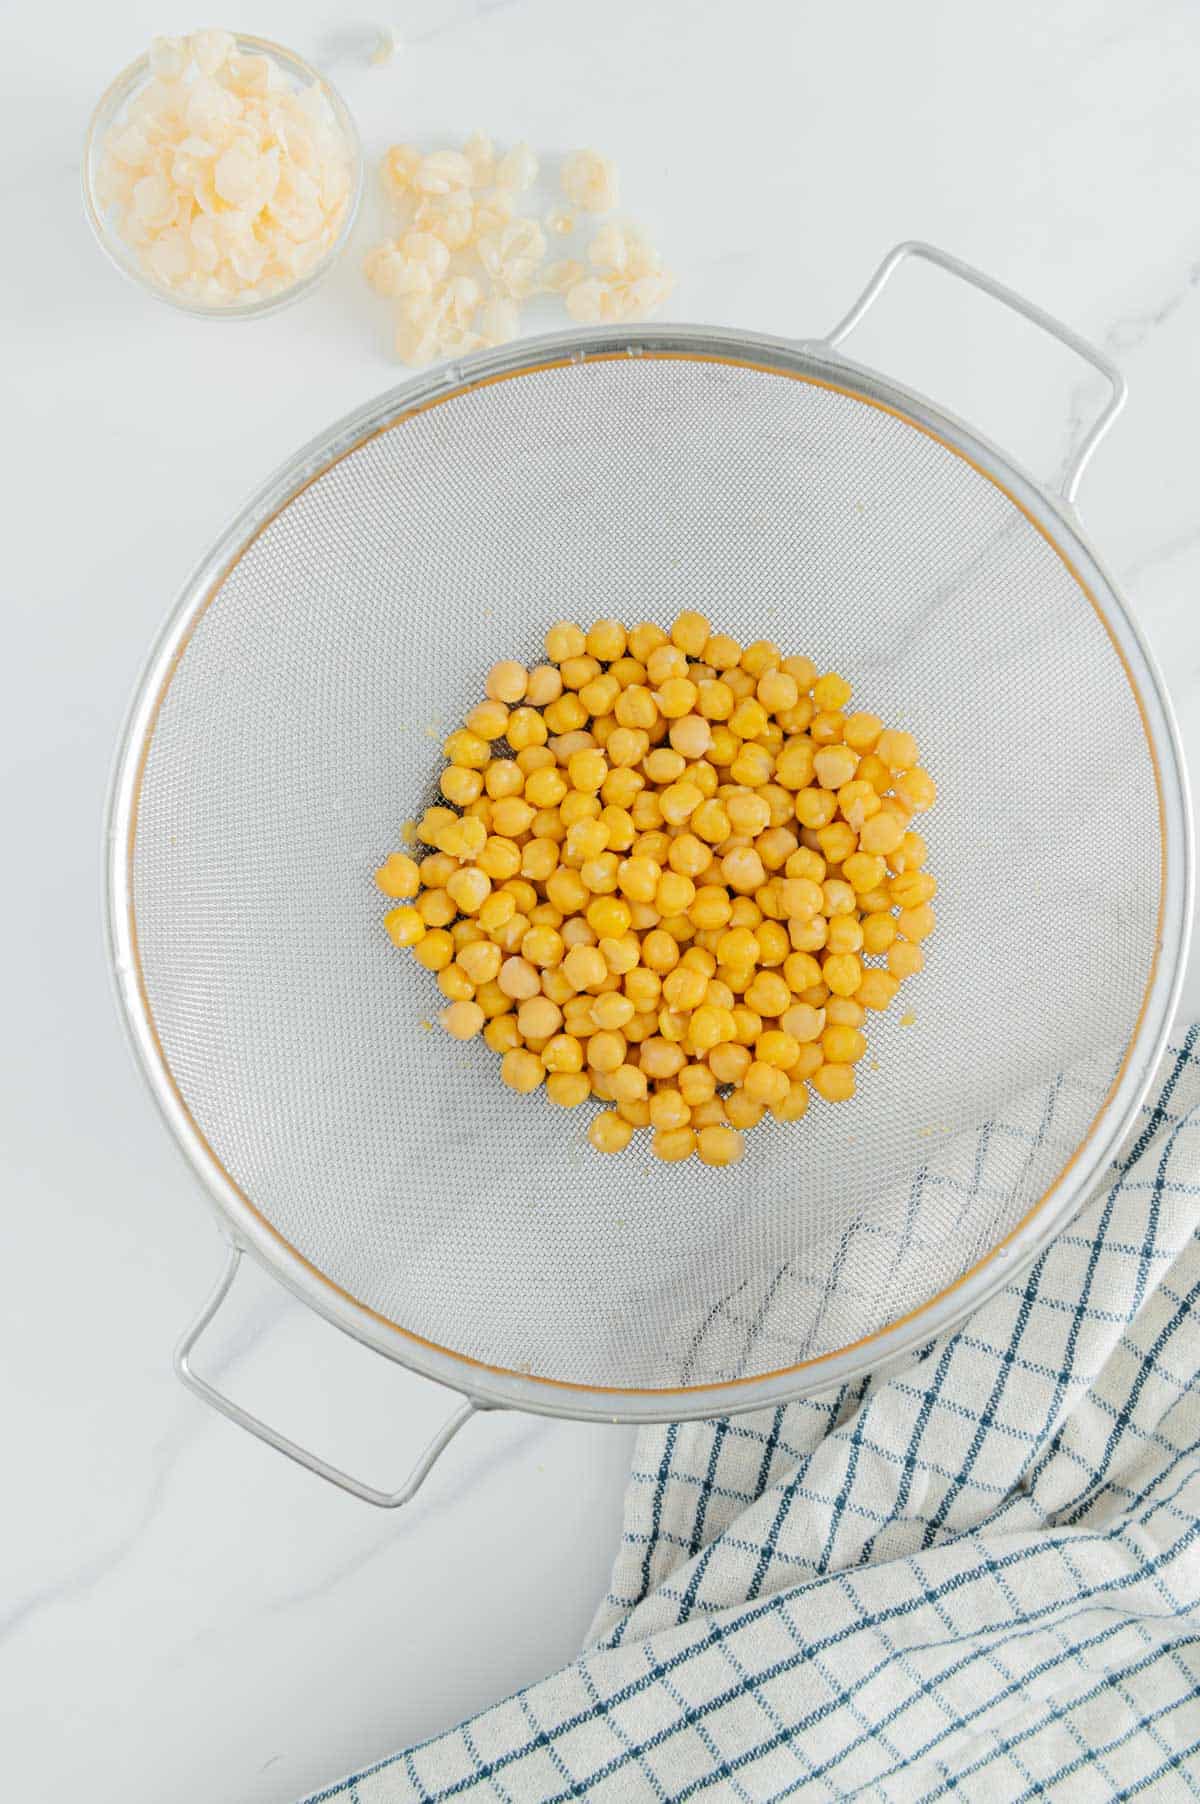
To remove the skins easily, rub the chickpeas with a kitchen towel while they are still in the fine mesh strainer after rinsing. This dries the chickpeas but also helps loosen the skins. Remove and discard any remaining skins by pinching the chickpea with your fingers.
How to Make BBQ Chickpeas
It all happens in one pan! Once your chickpeas are rinsed and patted dry with the skins removed, toss them with a bit of oil and pop them in then oven.


- Preheat oven to 375 degrees Fahrenheit.
- Remove the skins from the chickpeas. Rinse cooked chickpeas (canned or cooked from scratch) in a strainer and rub dry with a towel to help loosen and remove the skins.
- Place chickpeas on a 12-inch cast iron skillet. Do not use a smaller skillet or the chickpeas will overcrowd the pan and steam instead of crisp up. If doubling the recipe, use a second skillet or baking sheet.
- Toss the chickpeas with oil. Toss well with two spoons so the chickpeas are evenly coated in the oil. Spread the chickpeas out into one even layer (chickpeas ideally should not be touching).
- Roast the chickpeas. Roast for 35 minutes, tossing halfway (I simply shake the pan to roll the chickpeas around).
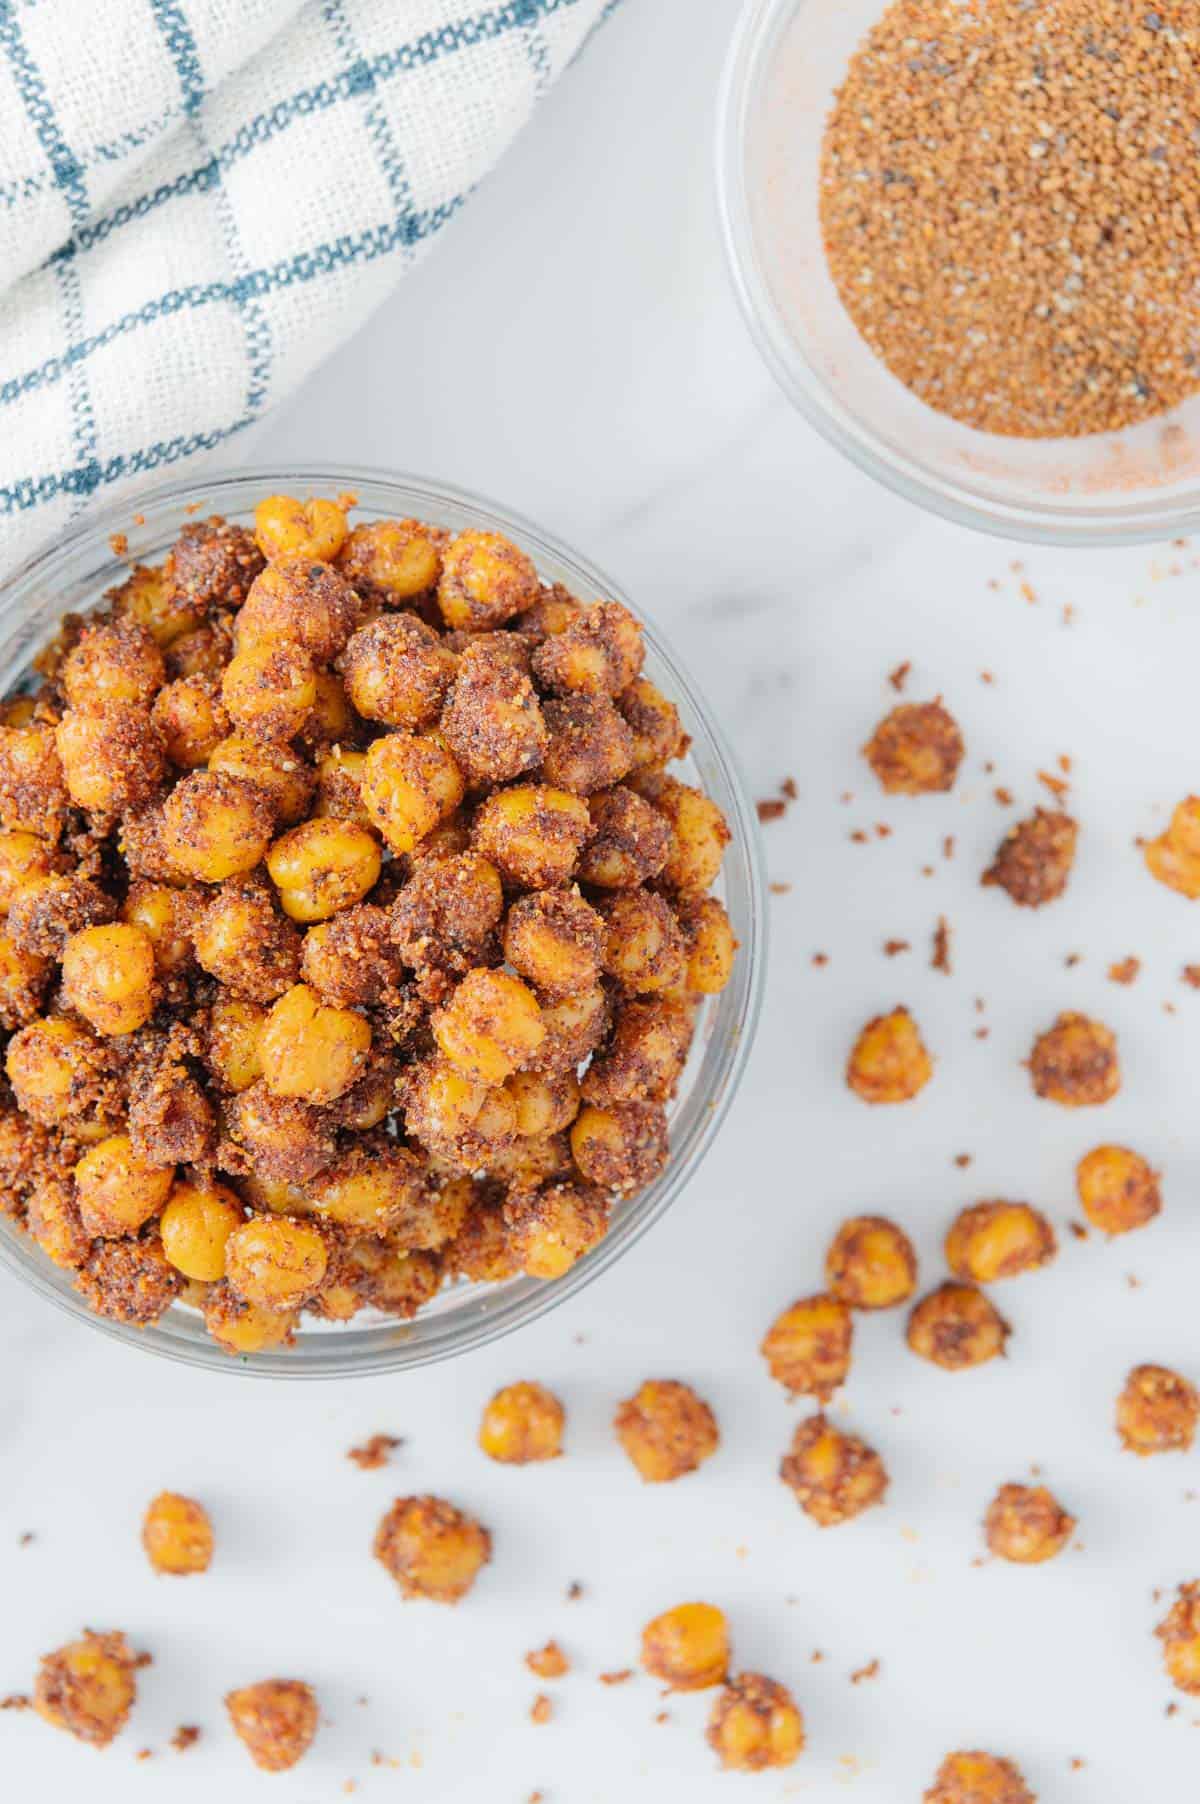
- While the chickpeas roast, prepare the BBQ spice blend. Whisk together the maple sugar and dry spices in a small bowl.
- Toss chickpeas with spice blend. Remove the skillet from the oven and immediately sprinkle the sugar/spice mix overtop and toss well to combine.
- Allow the cooked and seasoned chickpeas to cool for 5-10 minutes in the pan. Make sure they are spread out while cooling so they can crisp up even more.
- Serve! Once they are cool enough to handle, enjoy. Best when fresh and served warm.
Recipe Tip
Try to make sure the chickpeas are touching as little as possible in the pan and that they are in a single layer. I can't stress this enough! Crowding the pan creates pockets of heat that steam the chickpeas rather than roasting them, which is important because we don't want to lose that delicious roasted crunch!
Serving Suggestions
Barbecue chickpeas are the perfect addition to salads, grain bowls and soups. They can serve as croutons, only way better!
I've even put these in lettuce wraps and tacos and I love how they add nutrition and SO MUCH great flavor. The crunch never gets old, either! It's so satisfying as a finishing touch on my favorite meals.
But of course, my favorite way to enjoy these warm chickpeas are on their own... by the handful!

Storage
These chickpeas will be crispiest when fresh, but they can be stored for about 3-5 days at room temperature. Once they have fully cooled, transfer them to a jar or container and keep it open. The air will preserve their crispiness a little longer compared to if they are stored in an airtight container.
Why Eat Chickpeas?
I can never say enough about how great the mighty chickpea is. I always, always have them on hand and use them in so many easy recipes!
Chickpeas, also known as garbanzo beans, are a source of plant-based protein (so important for vegans and vegetarians!). They are an excellent source of folic acid, offer complex carbs and do not contain any cholesterol. They also have fiber to keep you full longer and aid in digestion.

This vegan and gluten-free snack is made without refined sugar, grains, soy or nuts. It's crunchy, delicious, and nutritious! I hope you'll tag me on Instagram if you make these so I can cheer on your kitchen adventures. Please also drop a review below!
More Ways to Enjoy Chickpeas


Crispy BBQ Roasted Chickpeas
- Total Time: 45 minutes
- Yield: 1.5 cups 1x
- Diet: Vegan
Description
Forget chips...these crispy BBQ roasted chickpeas are even more addictive and satisfying, and they're way more nutritious! Made with just chickpeas and a simple DIY BBQ seasoning, this easy recipe makes for an excellent snack the whole family can enjoy. Vegan, gluten-free, nut-free and soy-free.
Ingredients
- 1, 15.5 oz. can low-sodium chickpeas (garbanzo beans) or 1.5 cups cooked chickpeas
- 3 tablespoons avocado oil (or other neutral tasting oil - not olive oil or coconut oil)
- 1 tablespoon maple sugar (or sub coconut sugar)
- 2 teaspoons smoked paprika
- 1 teaspoon garlic powder
- 1 teaspoon chili powder
- ½ teaspoon onion powder
- 1 teaspoon fine salt
Instructions
- Preheat oven to 375 degrees Fahrenheit.
- Remove the skins from the chickpeas. To do so, place chickpeas in a fine mesh strainer and rinse well with water. While still in the strainer, rub them with a kitchen towel to dry the chickpeas and also to help remove the chickpea skins. When you gently press the chickpeas with the towel against the fine mesh strainer it will help to loosen and remove most of the skins quickly. Remove and discard any remaining skins by pinching the chickpeas with your fingers.
- Place chickpeas on a 12-inch cast iron skillet. Do not use a smaller skillet or the chickpeas will overcrowd the pan and steam instead of crisp up. If doubling the recipe, use a second skillet or baking sheet.
- Toss the chickpeas with oil. Toss well with two spoons so the chickpeas are evenly coated in the oil. Spread the chickpeas out into one even layer (chickpeas ideally should not be touching).
- Roast the chickpeas. Roast for 35 minutes, tossing halfway (I simply shake the pan to roll the chickpeas around).
- While the chickpeas roast, prepare the BBQ spice blend. Whisk together the maple sugar and dry spices in a small bowl.
- Toss chickpeas with spice blend. Remove the skillet from the oven and immediately sprinkle the sugar/spice mix overtop and toss well to combine.
- Allow the cooked and seasoned chickpeas to cool for 5-10 minutes in the pan. Make sure they are spread out while cooling so they can crisp up even more.
- Serve! Once they are cool enough to handle, enjoy. Best when fresh and served warm. Store at room temperature in an open container (not airtight) to best preserve crispiness.


Notes
Removing the chickpea skin is important for crispy results. If you leave the skin on it locks in the moisture and the chickpeas will get soggy when roasted.
Inspiration for tossing chickpeas in spices AFTER roasting came from The Nutritionist Reviews.
- Prep Time: 10
- Cook Time: 35
- Category: Snack
- Method: Oven

Nicole Hutton says
So simple but seriously SO GOOD!
Elaine Gordon says
Thank you so much, Nicole! I'm so happy to hear you enjoyed them so much. Best, Elaine
Darcy Townsley says
Is this something I can make ahead and store to snack on later?
Elaine Gordon says
Hi Darcy: Absolutely! I would recommend storing at room temperature and reheating in an air fryer or the oven for best results. Or you can enjoy at room temperature. I do find this recipe is best when enjoyed within an hour or two of making it (in terms of the texture) but you can definitely make-ahead for busy days. I would love to hear how you like it!